
 |
| Mesh tats, separate tube top |
 I
started learning to make rigged avatar attachments for Flying Saucers Return in 2013, while I
was crazy with pain and loaded on an assortment of chemo drugs and
morphine. My point: anyone can learn this. It takes time,
patience, a good eye and imagination and a little arithmetic.
It doesn't take high-level thinking. The hard part for me was finding the tools in the Blender interface. So I made a list,
and here it is.
I
started learning to make rigged avatar attachments for Flying Saucers Return in 2013, while I
was crazy with pain and loaded on an assortment of chemo drugs and
morphine. My point: anyone can learn this. It takes time,
patience, a good eye and imagination and a little arithmetic.
It doesn't take high-level thinking. The hard part for me was finding the tools in the Blender interface. So I made a list,
and here it is.This is not so much a how-to, as it is where the Weight Tools are, though I've added a few suggestions along the way.
I'm using the Avastar plugin for this example. If you're not, you've done the extra steps to import your skeleton from the Linden Lab Wiki, and have parented your mesh model to it, or you got the Avatar Workbench (a better idea) and are working with that. It doesn't affect this list significantly.
I'm
assuming that you've already worked on weighting clothing, starting with a mesh model that fits
closely to the avatar body, because it's a good way to learn. There are
great tutorials out there – I learned much from the Machinimatrix and Aine blogs. Medhue is another artist
well worth watching in his video tutorials. I've also learned a lot from Ben Simond's "Blender Master Class" - you'll want a paper copy unless you can see the illustrations on a large enough screen.
The model I'm using for the examples here is not a close-fitting piece of clothing, it's a loose chiton, which in real dressmaking is a piece of cloth folded over and pinned at the shoulders, belted over or under the foldover. You can make it in about 10 minutes with a sheet. Modeling and weighting is not so straight-forward, as a lot of vertices are too far from the bones for the default weighting to work, and I modeled it so that I can texture it as though it actually was a single piece of cloth. I'm weighting it in two sections - top and skirt, just to keep from going nuts. I may join them later.
If you've studied up you know that you need a well constructed clothing mesh model, made out of quads with rows and columns that wrap evenly around the outside of your avatar model, with enough vertices around the joints to move where it needs to move. If it's symmetrical on the x-axis, it'll be easier to weight.
 |
| Chiton, needs work |
If you've studied up you know that you need a well constructed clothing mesh model, made out of quads with rows and columns that wrap evenly around the outside of your avatar model, with enough vertices around the joints to move where it needs to move. If it's symmetrical on the x-axis, it'll be easier to weight.
The goal: After
weighting you're going to want to see your clothing mesh vertex rows and columns moving evenly while you move the
bones to the most common poses - walk, sit, dance - without overlapping vertices or spikes. Each bone's influence should show as gradual changes in the weight colors.
A vertex with 1.00 (all) weight from a bone will show as red in the weight mapping for that bone. 0.00 is dark blue and orange–yellow– green represent the values in between.
A vertex with 1.00 (all) weight from a bone will show as red in the weight mapping for that bone. 0.00 is dark blue and orange–yellow– green represent the values in between.
If you
have switched your mouse buttons (File>User Preferences>Input)
to select with the left mouse button instead of the right, so that
it's easier to shift between Blender and other software, then
control-left-click to select a bone, and shift-left-click to select a
vertex in Weight Paint vertex masking.
Memorize
this:
- Each vertex in your model will need to be weighted by at least one bone in the armature (the avatar skeleton).
- No more than four bones can influence (weight) a vertex.
- The numeric value for weighting for each vertex – the 4 bones or fewer that influence that vertex – is a percentage that must add up to 1.000.
I'm not
covering “fitted mesh” here – once you get the movement bones
under control, fitting to the collision bones is frustrating, but not
difficult to understand. The setup is different; the tools are the same.
I'm using
the Blender Default editor, with one modification – my bottom window is a UV editor instead of the Timeline editor (bottom far left box).
Most of the following is context sensitive – you won't see the tool until you have the right thing selected.
THE LIST
THE LIST
 |
| Outliner |
Avatar_meshes, and your clothing models.
- In my example here, I have two pieces of clothing – the two parts of my Chiton, each bound to the armature and within its outline.
- The eye icons on the right are useful to hide or show what you're working with. In the example I have the armature visible, the upper body mesh visible, the two pieces of my costume visible, and the Chiton top selected.
- You can use the Outliner to rename or delete components of your scene
- You can use the Outliner to select items, very handy in a crowded scene.
Properties
Window, just below the Outliner, on the far right. This window
has a series of tabs, labeled by icons.
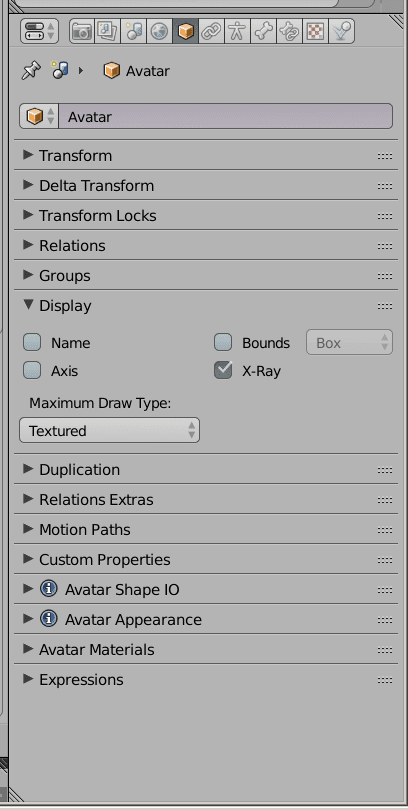 |
| Properties Window, Object tab |
- Object tab (cube icon)
- If you have your armature selected in the 3D-view window, scroll down to Display, and you have some choices. I have X-Ray clicked, so I can see the bones under the mesh models. If you scroll down a little further (if you're using an Avastar armature), you'll see Avatar Shape, Avatar Appearance, Avatar Materials, and Expressions tools, where you can make or upload custom avatar shapes and change the avatar mesh display.
- If you have your clothing attachment selected, the Display area changes to offer other choices, such as Wire, X-Ray and Transparency, which you should play with and see if they might be useful to the way you work. I occasionally check "Wire" but usually leave all this blank.
- Object Modifier tab (wrench icon) With your costume piece selected you can see your modifier stack. The one we're interested in here is the Armature Modifier, called Avatar Modifier if you're using an Avastar armature.
- “Vertex Groups” should be checked, and, usually, “Preserve Volume”, which helps. Look up "quaternions" if you want to know why.
- Leave the other check boxes alone, AFAIK they're not compatible with OpenSim avatars.
 |
| Properties Window, Modifier tab |
- Object Data tab (vertex triangle icon or armature icon)
- With your clothing model selected in weight paint mode, look at Vertex Groups.
- If you're using Avastar, Vertex Group assignments are created when you bind your clothing model to the armature, otherwise, depending on what model you imported, you may have to set up and assign vertex groups yourself.
- When your model is in Weight Paint mode, and you select an armature bone (Pose mode), the name of that bone shows up in the bottom left of your 3D-Viewer window. Depending on other settings, the weight painting (the rainbow colors) for that bone might not show up in your 3D Viewer but you can force the display if you also select the vertex group for that bone under the Object Data tab.
- If Vertex Selection Masking is on, you can
- Assign or Remove vertices in the vertex groups (experiment with this before you use it on something you care about)
- Use the Select or Deselect buttons to see which vertices are being influenced by which bones. If you're modeling something tight that closely relates to the avatar bones, such as a catsuit, the default vertex group assignments work pretty well. For loose clothing, like my chiton, where the vertices are further away from the bones, I'll end up changing some of the assignments.
- You can delete bone groups that you won't be using.
- With your your armature selected, rather than your clothing model, you'll see the armature icon instead of the vertex triangle icon for Object Data. Lots of interesting information here. You can select what you want displayed for your skeleton, such as Stick vs Octahedron, bone names, shapes, Xray, etc. Avastar also lists this stuff with useful presets in the Tool shelf. The rest of the settings are mostly for making animations.
 |
| Properties Window, Object Data tab |
Menu
“Header”. (see image below) Below
your 3D
view window.
You're already familiar with Object and Edit modes, using the
Tab toggle. To toggle between Object mode and Weight Paint mode, it's
Ctl-Tab, which is useful for seeing how you're doing with the
weighting, if you have a texture applied to your model.
- For simple models that follow the bones directly, this is all you need, with the Weight Brush Tools discussed below.
- For loose clothing that has more complex movement, you'll need more: When your clothing model is selected in Weight Painting mode, two cube icons appear in the Menu Header. The one on the right is “Vertex Selection Masking”.
- Vertex Selection Masking shows the vertices that you're weighting. Weighting is a percentage relationship between vertices and the armature bones. If you can see those vertices, it's easier to see what's going on. If you switch to Edit mode you can select rows or columns of vertices, and that selection will also display when you switch back to Weight mode with Vertex Selection Masking selected. It's much easier to make useful selections in Edit mode than it is in Weight Paint mode.
- [NOTE: switching between modes can cause Blender to crash if you hit the wrong key with your left hand. Save your file each time first – ctl-S]
- Just to the right of the mode selector is a view selector - you may like adjusting the weighting of vertices in wireframe mode with Vertex Selection Masking selected - it's easier to see if your rows and columns are staying straight.
 |
| User Persp., Property Shelf activated, Torso bone selected, mTorso group selected, Vertex Selecting Masking on, and a single vertex selected to see the incorrect weights. |
- One cool thing about working with one vertex at a time is you can really see what's happening in problem areas – use the sliders until the vertex is in the right place for the pose, then don't forget to hit “Normalize” to recalculate the arithmetic. Other options to Normalize the percentages aren't as good.
- This is where you find out that which vertex you work on next matters – sometimes you can't move a vertex where you want it to go for that bone rotation until you've moved the ones around it, or even several rows away.
3D-View window. We're usually working in User Ortho mode, but
sometimes it's easier to work from the inside the model, and for
that you need User Persp mode. Numpad "5"is the toggle
between the two modes.
 |
| Tool Shelf to the left - Weight Paint Brushes and other tools, Vertex Mask Selecting on, a single vertex selected |
Tool
Shelf. Far
left panel, toggled on
and off with
“t”. When
your mesh model is selected in Weight Paint mode you'll find Weight tools
– usually the top tab called “Tools”. How you use these depends
on the model you're weighting.
- Weight painting takes practice and patience, and is both logical and intuitive. If you're making something to emulate soft fabric and you raise the left collar bone, you're going to want to see the vertices at the top of the shoulder and arm follow the avatar mesh, and the vertices under the arm and around the top of the chest and back lift a little while draping around the avatar mesh. For something stiffer, like a leather biker vest, the whole side of the vest might lift and swing out.
- My brush settings are usually: Add or Subtract brush at around .005 strength, or Blur at .250, radius depending on what I'm working on. But everyone's work flow is different.
- I keep Auto Normalize (right under the weight brush sliders) checked, which keeps the total weight on a vertice at 1.00 while using the brushes, so if I'm using the Add brush, it adds weight from whatever bone is selected in the 3D window, and reduces weights from the other bones involved.
- Auto Normalize can have unexpected results, especially with the Blur brush, so if something has gone wrong, you may have to go back to vertex groups in the Properties Window and Vertex Weights in the Property Shelf, to discover that, for example, your left ankle somehow got involved with your right shoulder vertices and you're going to want delete some vertex group selections or bone weights in the Vertex Weights. It happens. It's not pretty.
- It's easy to accidentally involve more than 4 bones. My chiton got hip weights in the areas under the arm from the default weighting assignments, blech.
- The bones you don't want involved might not be the ones that get deleted by using the “Limit Total” tool (below the Weight brushes).
- “Normalize All” can be useful, or a mess, for mesh models that don't follow the bones directly.
- With this model, I might need to deal with problem areas by looking at each vertex in the Properties Shelf and deleting bone settings individually. Or at least look at a few from a problem area to see where they're going and go back to Vertex Groups in the Properties Panel to check for vertices in the wrong places.
- In the Tool Shelf under Options I usually have X Mirror and Topology Mirror checked, and that's great while working on the central bones, maybe not so good working on arms and legs.
- It won't ever be perfect, and you'll end up making an alpha layer to hide the avatar mesh bits that poke through in more extreme poses. I'll repeat the goal here for cloth or leather: smooth transitions between weight paint colors, even rows and columns where possible, no overlapping vertices or spikes.
If
you're using the Avastar plugin, then you already know that most of these
tools are consolidated, rearranged, and enhanced in the Avastar tab
in your Tool shelf.
And
that's it! These are your tools.
I
almost certainly missed things or wrote about them without nearly
enough clarity. Suggestions are welcome.
last updated 5/7/2016
last updated 5/7/2016
No comments:
Post a Comment
We appreciate your feedback. Inappropriate posts will be deleted.